
Peterbilt 379 Steering Shaft Replacement Guide

If you are undergoing a Peterbilt 379 steering shaft installation, this brief guide covers everything you need to know: component anatomy, part fitment, step-by-step installation, safety checks, and bad steering shaft symptoms on a Peterbilt 379.
Why Replacing the Peterbilt 379 Steering Shaft Matters
PURPOSE: It connects the cab-mounted steering column to the frame-mounted steering gear. It transfers steering input, handles torque, and absorbs vibration.
Ignoring a failing steering shaft can lead to sudden loss of vehicle control.
Common failure signs:
- Excessive steering wheel play
- Clunking noises near the floorboard
- Binding or "notchy" steering feel
- Steering wheel vibration
- Off-center steering wheel
- Steering jerks during hard braking
It's easy to misdiagnose the issue. Steering shaft symptoms are often mistaken for problems in the steering gear, drag links, tie rods, kingpins, or front wheel alignment.
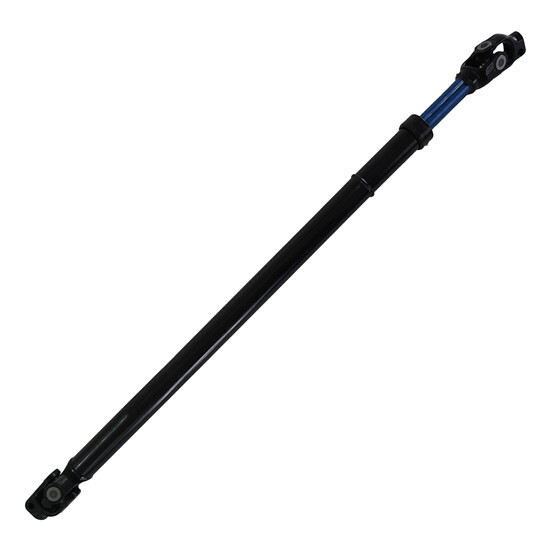
What Is the Steering Shaft on a Peterbilt 379?
It’s sometimes called the intermediate steering shaft, lower steering shaft, column shaft, or steering shaft assembly.
This heavy-duty part handles endless wear and tear, be it heavy steering torque, constant independent cab movement, aggressive frame flex, intense engine vibration, enduring more heat under the hood, nasty winter road salt, and super long service intervals.
The Anatomy of the Steering Shaft Assembly
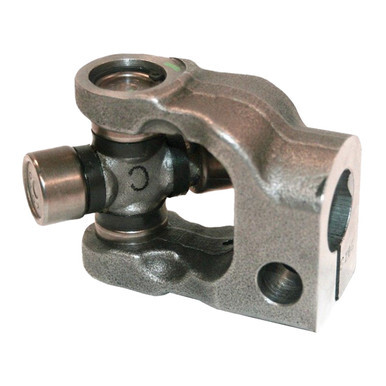
Upper Shaft / Column Shaft: This top section connects the cab's steering column to the intermediate steering shaft.
- Common Issues: Looseness at the connection point, clunking noises near the firewall, or worn upper mounting hardware.
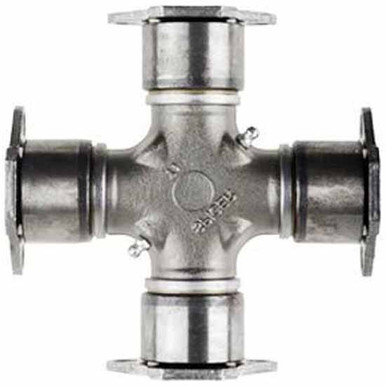
Universal Joints (U-Joints): These joints allow the shaft to transfer rotational movement smoothly through an angle.
- Common Issues: Worn internal needle bearings will cause binding, excessive steering play, or a distinctly "notchy" feel when turning the wheel.
Slip Shaft / Slip Yoke: A telescoping section that actively expands and compresses to accommodate the independent movement of the cab's suspension.
- Common Issues: If this sliding section freezes or seizes, it acts as a rigid rod, forcing intense cab-movement stresses directly into the delicate steering gear.
Vibration Dampener / Isolator: A heavy-duty rubber component designed to absorb road shock and engine vibration, preventing harsh metal-to-metal feedback from reaching your hands.
Lower Shaft, Coupler, and Pinch Bolts: This critical lower assembly connects the steering shaft directly to the splines on the steering gear box input shaft. It is clamped down tightly with high-strength pinch bolts to ensure your steering input transfers without slipping.
- Common Issues: A bent lower shaft will wobble as it spins, acting like a hammer that destroys the steering gear's input seals. Other red flags include loose or stretched pinch bolts, worn couplers, stripped splines, loud popping noises during sharp turns, or a steering wheel that suddenly sits off-center.
- Safety Warning: This connection is vital for vehicle control. If the splines have slipped, you must carefully inspect both the shaft coupler and the steering gear input shaft for damage.
Never reuse old or stretched pinch bolts; always discard them and install new hardware - especially on DIY-installs.
Before You Replace, Inspect These Areas
- Test free play: Rock the steering wheel to check for delayed response at the gear box.
- Visual sync test: Have a helper turn the wheel. Watch for joints or sections that move out of sync with the rest of the shaft.
- Inspect wear points: Look for rust (fretting corrosion) on U-joints, torn rubber slip boots, and dry splines.
- Check environment: Inspect for missing exhaust heat shields or a cab ride-height that is set too high or low.
Steering Shaft Symptom-to-Cause Guide
Diagnostic Tip on Steering Leaks & Their Root Causes
Pro-Tip: If you notice power steering fluid weeping from the gear box input seal, the seal is often the victim, not the root cause. A worn lower U-joint or bent shaft will wobble as it spins, repeatedly hammering the input shaft until the seal tears. Always inspect the lower shaft coupler for play before investing in a brand-new steering gear box or replacement seal; otherwise, the wobble will quickly ruin your new seal the exact same way.
Fitment Checklist Before Ordering
Peterbilt 379 steering shafts vary greatly depending on chassis configuration. Confirm these exact details before purchasing a replacement:
- Truck model year and full VIN.
- Hood configuration (Standard vs. Extended).
- Upper steering column output spline count/size.
- Lower steering gear box input spline count/size.
- Exact collapsed and extended length requirements.
- Required coupler type and pinch bolt style.
Tools and Safety Preparation
Required Tools:
- Basic hand tools and torque wrench
- Paint marker or scribe
- Penetrating oil and clean rags
- Pry bar or wedges
- Wheel chocks, safety glasses, and gloves
- New replacement hardware kit (pinch bolts)
Safety Guidelines:
- Park on level ground, engage parking brakes, and chock the wheels.
- CRITICAL WARNING: Do not turn the steering wheel once the shaft is disconnected. Tie it down. Letting it spin freely will destroy the steering column's internal clock spring and ruin system centering.
- Never drive the truck if you suspect steering hardware is loose.
Diagnostics & Pre-Replacement Inspection
Before tearing the assembly apart, perform a comprehensive system inspection to confirm the shaft is the root cause.
- Test for free play: Gently rock the steering wheel to check for a delayed response at the steering gear box.
- Visual sync test: Have a helper turn the wheel. Watch the shaft closely for independent movement where one section turns before the adjoining part responds.
- Inspect wear points: Check for fretting corrosion ("red dust") on U-joints, torn rubber slip boots, and dry splines.
- Check the environment: Look for missing exhaust heat shields, heat-damaged grease, or a cab ride-height that is set improperly (forcing the shaft to overextend or bottom out).
Step-by-Step Removal Process
- Center the System: Perfectly center the steering wheel and the front wheels. Secure the steering wheel with a strap.
- Mark Alignment: Use a paint marker to draw a straight line across the shaft, yokes, couplers, and the steering gear input.
- Remove Hardware: Loosen and completely remove the upper and lower pinch bolts.
- Detach the Shaft: Slide the shaft off the splines. If the lower coupler is rusted/seized, gently tap a wedge into the coupler's split gap to spread it open.
- Compare Parts: Set the old shaft next to the newly purchased shaft. Verify the exact length, slip travel, and spline compatibility before discarding the old unit.
Step-by-Step Installation Process
- Check U-Joint Phasing: Align the U-joints parallel to one another (according to manufacturer's instructions) so they are correctly in phase. The yokes on both ends of the intermediate shaft should typically line up parallel to one another. The "U-join phasing" is the rotational alignment of the yokes at both ends of the steering shaft. If it's misaligned, the steering response will be rigid.
- Secure the Connection: Slide the upper shaft and lower coupler onto their respective splines. Verify full spline engagement so the shaft sits at the correct depth.
- Align the Hardware: Confirm the pinch bolt passes cleanly through the machined groove on the input shaft. The bolt should slide in easily; do not force or hammer it.
- Install New Hardware: Use only brand-new or OEM-approved pinch bolts. Never reuse stretched hardware. Torque all fasteners strictly to OEM specifications.
- Lubricate: If your replacement shaft features greaseable fittings, apply fresh grease thoroughly to the U-joints and slip splines.
Common Installation Mistakes to Avoid
Common Steering Shaft Replacement Mistakes
Post-Installation Safety Checks
- Slip Shaft Travel: Verify the telescoping shaft is not fully compressed (bottomed out) or fully extended when the cab is at its normal ride height; these two extremes can cause mechanical strain on the steering system.
- Steering Alignment: Confirm both the steering wheel and front tires are perfectly centered.
- Torque Specs: Double-check all pinch bolts and couplers with a torque wrench.
- Clearance: Ensure the shaft does not touch nearby exhaust parts, frame rails, hoses, or wiring harnesses.
- Lock-to-Lock Test: Safely raise the front axle. Turn the steering wheel from stop to stop to ensure there are no tight spots or binding.
- Road Test: Perform a low-speed yard drive to confirm the steering feels tight, responsive, and predictable.
Maintenance Tips to Extend Steering Shaft Life
- Lubricate all greaseable U-joints and sliding splines during every PM service.
- Inspect rubber dust boots regularly; replace immediately if cracked or torn.
- Ensure exhaust heat shielding remains securely in place.
- Monitor cab ride height and leveling valves to ensure the shaft operates at the correct angle.
- Avoid spraying high-pressure water directly at joint seals during truck washes.
Replacement Cost & Downtime Factors to Consider
Repair costs vary depending on whether you purchase a complete assembly or individual components, choose OEM vs. aftermarket, and factor in your specific hood length. Costs escalate quickly if a wobbling shaft has already stripped the steering gear splines or destroyed the input seal.
Always opt for high-quality, heavy-duty parts. A cheap, inferior steering shaft that breaks prematurely will cost you significantly more in emergency towing, shop downtime, and potential safety hazards than the initial savings.
Find Heavy-Duty Steering Replacement Parts at 4 State Trucks
Explore a wide array of replacement steering components and suspension upgrades to elevate the over-the-road performance of your Peterbilt 379 (1987 - 2007) model. Shop for hardware and parts at the 4 State Trucks parts store in Joplin, Missouri, or by using the mobile app.
Steering Shaft Replacement FAQs
Recent Posts
-
8 Signs Your Peterbilt 379 Steering Shaft Needs Replacement
 Steering issues on a Class 8 heavy-duty truck are a critical safety concern, and recognizing the bad …10th Jun 2026
 -
Most Common Replacement Parts for Freightliner FL70
 Freightliner FL70/FL80 Business Class trucks see a lot of wear and tear while running job sites. The …9th Jun 2026
 -
Factory Peterbilt 379 Exhaust Mufflers vs Straight Pipes
 When it comes to Peterbilt 379 factory-style exhaust muffler setups versus performance straight pipe …5th Jun 2026
 -
9 Costly Peterbilt 379 Exhaust Stack Replacement Mistakes to Avoid
 Although replacing exhaust stacks on a Peterbilt 379 is a bit easier than some other models, it can …3rd Jun 2026
 -
How to Measure a Kenworth T880 Visor Before You Buy
 Here's a quick reference guide on how to measure a Kenworth T880 visor. To avoid ordering the wrong …1st Jun 2026
 -
T880 Exterior Upgrades for Highway Trucks
 The Kenworth T880 (2013 - present) is a popular vocational truck with a set-back axle that is design …29th May 2026
 -
T880 Visor Ultimate Buyer's Guide
 There are countless Kenworth T880 visor options to choose from depending on the theme and style you’ …27th May 2026
 -
W990 Drop Visor Installation Guide
 How to Install a W990 Visor Installing a Kenworth W990 visor requires careful measuring, test-fittin …26th May 2026
 -
Factory vs Custom W990 Visors (The Glaring Differences)
") What are some of the biggest differences between a factory OE visor and custom truck visor for the W …22nd May 2026
What are some of the biggest differences between a factory OE visor and custom truck visor for the W …22nd May 2026