
Stud Pilot vs Hub Pilot Wheels: What's the Difference?

If you're looking to shop replacement wheels or wheel-end accessories, mixed Ecommerce inventories can create some confusion around which wheel setup is the right one, the preferred one.
Here's a full guide on the difference between hub pilot vs stud pilot wheels, as well as instructions on how to convert your wheels.
The Difference Between Stud Pilot and Hub Pilot Wheels
| Feature | Stud Pilot/Budd | Hub Pilot |
|---|---|---|
| Centering Method | The studs and spherical-seated lug nuts | The center hole of the wheel resting on hub pads |
| Wheel Bolt Holes | Chamfered/beveled to cup the nut | Flat and straight-cut |
| Lug Nuts, Dual Wheels | Two nuts: a square inner nut and a hex outer nut | One single, two-piece flange nut with integrated washer |
| Thread Direction | Left-hand threads on driver side; right-hand threads on passenger side | Right-hand threads on all wheels |
How Does the Truck Wheel Center?
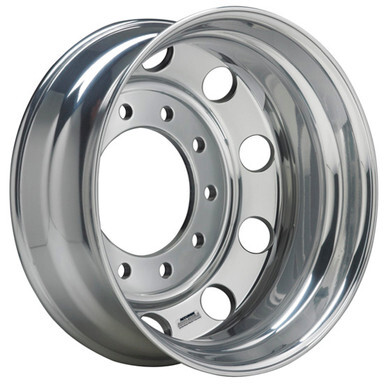
Stud Piloted ("Budd" System): studs and lug nuts center and support the wheel, but the center bore does not align the wheel whatsoever.
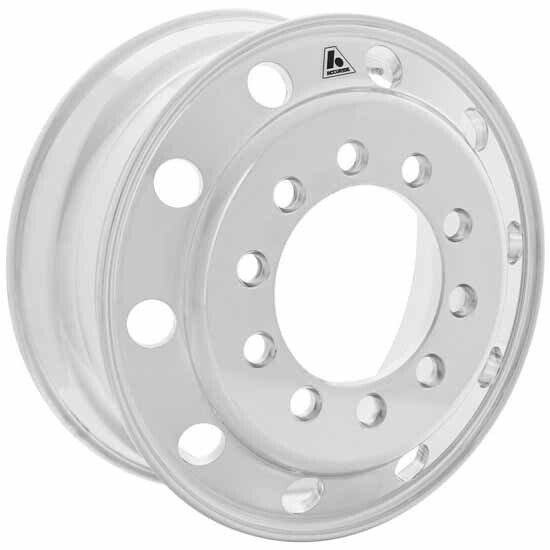
Hub piloted: the hub centers the wheel, not hte lug nuts and studs. The wheel center bore is what fits over the tangs (protruding machined parts) on the hub ridge.
The studs and flat-faced flange nuts merely add extra clamp force to help hold the wheel against the surface mount point.
60-Second Visual Checklist
The Bare Wheel Test
Look at the bolt holes.
- Hub Pilot: flat and flush.
- Stud Pilot: beveled and countersunk to seat a tapered nut.
Mounted Wheel Test
Look at the lug nuts.
- Hub Pilot: 33mm nut with an integrated, free-spinning flat washer.
- Stud Pilot: solid nut with noticeable taper diving into the wheel recess. t.
The History and Evolution of "Budd" Wheels
Stud-pilot systems were the only game in town - the industry standard. By the early 2000s, trucking manufacturers began to shift nearly entirely to hub-piloted systems instead.
This led to three major benefits:
- Inventory Reduction: Hub pilot cuts fastener inventory in half by eliminating the complex square inner nuts required for dual setups.
- Labor Savings: Simplifies tire rotations. A mechanic removes 80 nuts across tandem axles instead of 160.
- Eliminated Thread Confusion: Eradicates the old, confusing practice of using left-handed threads on the driver's side to combat precessional loosening.
Never Mix Stud and Hub-Wheel Parts
Hub Pilot on a Stud Pilot Hub: the spherical stud-pilot lug nuts will not seat properly, sheering the studs and detaching the wheel entirely.
Stud Pilot on a Hub Pilot Hub: the center hole is larger that the hub pilot wheel so it won't rest on the centering pads, which means the wheel will cause a massive out-of-round ivbration that eventually snaps the wheel studs.
The Anatomy of a Stud to Hub Conversion Kit
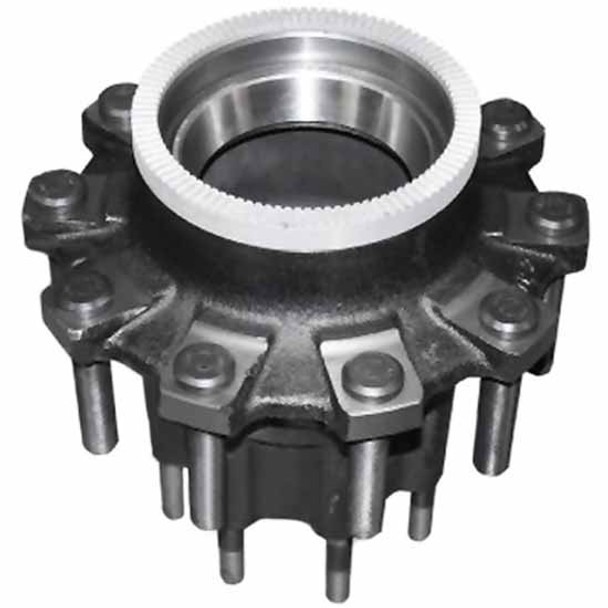
When you order an Automann wheel-end conversion kit, you're getting a ready-tomount unit that can slide directly onto your exisitng SQ100 axle spindle.
- The cast features machined tangs or pads across the hub ridge which eliminates the need for old beveled hardware.
- Pre-installed M22 x 1.5 studs come pressed into the flange (so you don't need to purchase additional studs).
- Pre-pressed bearing cups are seated internal and external to the hub, so you'll just need matching bearing cones (the roller) and to oil/grease those up.
The old-school Factory Rockwell SQ100 Budd hubs used inboard brake drums.
The drum was bolted to the back of the hub. This made something as simple as a brake shoe replacement tedious (eg. draining axle oil, pulling the axle shaft, removing the spindle nut, etc.).
Automann conversion hub has an outboard brake drum setup. Now you just take the wheels off and slide the drum brake off (without removing the hub or axle shaft)!
It's a plug-and-play structural adapter to help you seamlessly modernize your flat-faced wheels.
While some owner-operators salvage old, used hub-pilot hubs to make the conversoin, this product doesn't have millions of torque cycles and hardware stress.
You're getting a new part, after all.
It has factory-tight tolerances so the bearin races won't spin inside the hub.
It is deliberately machined to match the inner/outer bearing diameters and spindle nut threading of the Rockwell SQ100, ensuring the right fit.
How to Convert From Budd to Hub Pilot Wheels
The Essential To-Do List:
- Cast the hubs with proper centering pads
- Add the wheel studs that are longer-, specific hub-pilot tsuds
- Outboard =-mounted brake drums are designed to sti flat against htenew hub.
- The hub pilot wheels have straight-cut holes.
- The two-piece flanged nut should be replaced.
#1. Get a Required Parts List
- Hub Pilot Hub Assemblies: These hubs are cast with specific machined projections (centering pads) on the hub ridge that the new wheels will rest on.
- M22 x 1.5 Wheel Studs: Modern metric, right-hand thread studs. (If buying complete pre-assembled hubs, these will already be pressed in).
- Outboard Brake Drums: Hub pilot systems transition you to "outboard" brake drums, which slide perfectly over the new wheel studs and sit flush against the hub face.
- Hub Pilot Wheels: Aluminum or steel wheels featuring a 285.75mm center bore and straight-cut, flat bolt holes.
- Two-Piece Flange Nuts: 33mm metric hex nuts with integrated, free-spinning washers.
- New Wheel Seals and Bearings: Since you are pulling the hubs, you must install fresh wheel seals. It is also highly recommended to replace the inner and outer wheel bearings and races at this time.
#2. Remove the Existing Wheel Setup
- Lift and Secure: Jack up the axle and support the vehicle securely with heavy-duty safety stands.
- Remove the Budd Wheels: Remove the legacy left-hand and right-hand threaded lug nuts and pull the old dual wheels off the axle.
- Pull the Axle Shaft (Drive Axles): Unbolt the axle flange nuts and slide the drive axle shaft completely out of the housing to expose the spindle nut.
- Remove the Old Hub & Drum Assembly: Remove the spindle nut and pull the entire Stud Pilot hub off the spindle. Note: Most old Stud Pilot systems use "inboard" brake drums, meaning the drum is bolted to the back of the hub. You will pull the heavy hub and drum off as one massive unit.
- Clean the Spindle: Strip away the old wheel seal and thoroughly clean the bare axle spindle. Inspect the spindle threads and bearing surfaces for galling, heat discoloration, or wear.
#3. Installing the Hub Pilot Configuration
- Install New Bearings and Seals: Pack your new inner wheel bearing with the correct gear oil or synthetic grease (depending on your setup) and drop it into the back of the new Hub Pilot hub. Carefully press the new wheel seal into the back of the hub.
- Mount the New Hub: Slide the new Hub Pilot hub straight onto the axle spindle. Slide the outer bearing into place.
- Set the Wheel End Play: Thread on the spindle nut system. Torque the spindle nut according to TMC (Technology & Maintenance Council) specifications to achieve the perfect wheel bearing end-play (typically between 0.001 and 0.005 inches). Lock the spindle nut in place.
- Slide on the Outboard Drum: Slide the new outboard brake drum directly over the wheel studs. It will rest cleanly against the flat face of your new hub. (Future brake jobs will now take a fraction of the time because you no longer have to pull the hub to remove the drum!)
- Reinstall the Axle Shaft: Slide the drive axle shaft back into the housing, use a new axle flange gasket, and torque the flange nuts to spec.
#4. Mounting and Torquing the Wheels
- Mount the Inner Dual: Slide the inner Hub Pilot wheel onto the studs, ensuring the center bore slides perfectly over the machined centering pads on the hub.
- Mount the Outer Dual: Slide the outer wheel onto the same centering pads.
- Lubricate the Hardware: Apply exactly two drops of 30-weight oil to the threads of each stud, and two drops between the 33mm nut and its integrated free-spinning washer. Never oil the wheel face or hub face.
- Torque to Spec: Thread on the two-piece flange nuts. Using a calibrated torque wrench, tighten the nuts in a standard crisscross star pattern to 450 – 500 ft-lbs.
Finished? Test drive the truck. Remember to re-torque all the new 33mm flange nuts after the first 40 to 100 miles of driving.
Maintenance & Safety Tips
Stud Pilot Maintenance.
Never use oil or anti-seize to the threads of a stud pilot or the ball seats of the nuts/wheels, since they must be torqued while dry. Lubrication could cause you to excessively torque them, stretching the studs.
For dual wheel setups, use a special square socket to tighten the inner nut before adding the outer wheel. If the inner nut is loose, the assembly fails.
Hub Pilot Maintenance.
Apply two drops of 30-weight oil to the threads and to the joint where the flange washer meets the nut, but do not oil the wheel or hub face. Check the washers before reusing a flange nut.
You should be able to spin the washer with your fingers. If it doesn't budge, throw it away and buy a replacement. A stuck washer can gouge the wheel face.
4 State Trucks Wheel-End Accessories and Parts
Find wheel-end accessories and hardware that spans from budd-to-hub conversion kits, wheel simulators, and nut covers to axle/hub covers, and decorative spinner tops to completely renovate your semi truck wheels.
Recent Posts
-
Haul of Fame: J&L Contracting's Award-Winning Truck
 Kenworths: Never Satisfied & Devilish Ways When you talk about Midwest trucking, heavy hauling, and …17th Sep 2026
 -
Semi Truck Exhaust Systems: Parts, Materials, Fitment & Repair Guide
 How a Semi Truck Exhaust System Works A heavy-duty exhaust system has three main jobs: route burned …16th Sep 2026
 -
Diesel Truck Engine Maintenance Guide
 Semi truck engines can last up to one million miles, or more, before they need to be rebuilt or repl …4th Sep 2026
 -
How to Buy the Right Peterbilt 379 Radiator
 If you want to keep your diesel engine from overheating you need a well-functioning replacement Pete …28th Aug 2026
 -
10 Essential Cost-Per-Mile Truck Upgrades that Pay for Themselves
 Small aftermarket semi truck accessories and performance upgrades save more money over time than the …21st Aug 2026
 -
Seasonal Semi Truck Maintenance Checklist
 Freezing winter weather temperatures, heavy snow, ice, and road salt take an unseen toll on your sem …14th Aug 2026
 -
Haul of Fame: Richard Bonner’s 1996 Peterbilt 379 — Bringing a Classic Trucker’s Truck Back to Life
 Every truck has a story, but some are worth taking a closer look at. Richard Bonner’s 1996 Peterbilt …14th Aug 2026
 -
Surviving the Scale: How to Pass Your DOT Inspection & Avoid Crippling Fees
 DOT semi truck inspections can make anyone nervous. There are multiple levels that start from a quic …7th Aug 2026
 -
Semi Truck Brake System Maintenance Guide
 Semi-truck brake defects account for 30% of out-of-service violations, according to CVSA’s 2025 Inte …4th Aug 2026
 -
How to Build a Semi Truck Emergency Kit (A Complete Checklist)
 Semi-truck breakdowns cost money and time; but they aren't inevitable. With the right emergency acce …30th Jul 2026