



Peterbilt Truck Speed Sensors: Everything You Need to Know

You're driving at 70 mph, but your dash says 0. Each shift jerks you forward and the cruise control won't stay on. Sound familiar? It's your Peterbilt speed sensor that's breaking down.
Buy a low-cost speed sensor replacement ahead of time and store it for a rainy day. It can prevent a lot of costly downtime. We keep a massive supply of heavy-duty replacement parts for Peterbilt in stock and ready to ship.
Key Takeaways
Speed sensors send data to the speedometer, transmission, cruise control, ABS, and mileage systems.
Common failure signs: erratic speed readings, hard shifts, ABS warnings, lack of cruise control, and fault codes.
Match replacements by OEM number, transmission, connector, wire count, sensor length, and mounting style.
Inspect the wiring, terminals, tone ring, air gap, O-ring, and sensor tip before installation.
Clear fault codes and verify the speedometer, shifting, cruise control, and sensor readings after replacement.
What is a Speed Sensor in a Semi Truck?
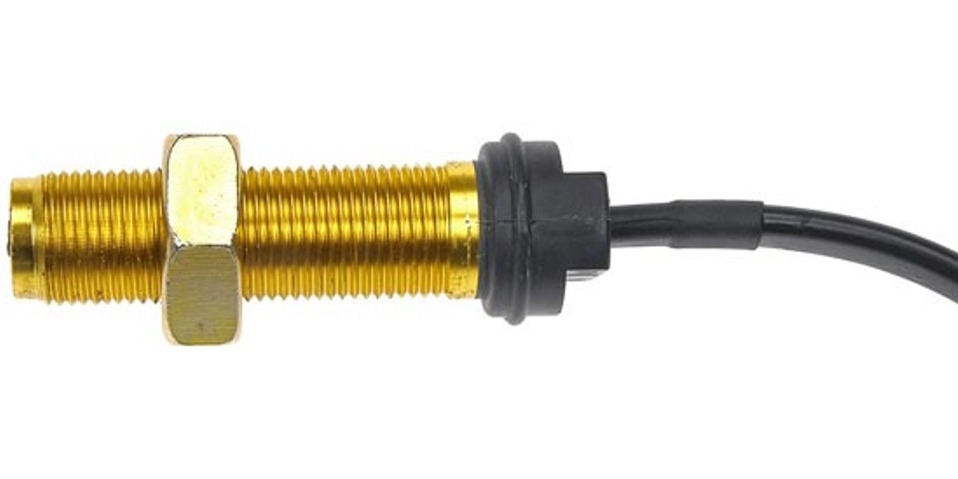
Basically, the speed sensor monitors the rotational speed of the wheels, converting the motion of the wheel into an electronic signal which is sent to your truck’s electronic control unit (ECU) or powertrain control module (PCM).
This sends accurate information to calculate speed and distance, tracking the distance traveled. It also provides information that controls the cruise control system, transmission shifts, and the ABS.
If you’re buying an aftermarket Peterbilt speed sensor replacement, it’s important to prioritize quality manufacturing, not just price.
The ABS sensor, however, monitors the RPM of each wheel. These sensors sit next to the hub or brake assembly of each wheel end, faced directly toward a timing wheel or tone ring.
A failed wheel sensor triggers an ABS warning light and disables the anti-lock braking.
Types of Speed Sensors: A Quick Overview
Magnetic/Passive Sensors
- Oldest and simplest style.
- Uses a magnetic pickup coil.
- Produces an AC voltage signal that increases with wheel or shaft speed.
Hall-Effect/Active Sensors
- Requires external power (usually 5-12 volts).
- Contains an internal circuit that produces a digital square wave signal.
- More precise than passive sensors, even at low speeds.
- Detects direction of the rotation and the speed.
Variable Reluctance Sensors
- It’s a passive sensor that works on the principle of changing magnetic reluctance as the metal tooth passes the sensor.
- Found in transmission-mounted VSS setups.
Digital/Microprocessor-Based Sensors
- Found on newer Peterbilt models with advanced ECMs.
- Integrates diagnostics and sends data over the CAN bus instead of raw voltage.
Speed Sensor Location on a Peterbilt Semi Truck
Normally, a speed sensor is located on the transmission output shaft, differential housing, or wheel hubs depending on year/model.
The location is typically the same on a Kenworth truck since they both use a PACCAR system.
Common Peterbilt Speed Sensor Problems & Symptoms
What Happens When a Speed Sensor Goes Bad?
- An erratic or inoperable speedometer.
- Transmission shifting issues (late or difficult shift).
- ABS warning light comes on or the ABS traction control gets disabled.
- Cruise control isn’t working.
- Diagnostic fault codes in your ECM/ABS module.
Other signs: Diagnostic fault codes, poor fuel efficiency.
How to Reset or Test a Peterbilt Speed Sensor
How to Reset a Speed Sensor?
- Clear codes with diagnostic tool.
- Disconnect truck battery power briefly to reset ECM/ABS module.
- Test continuity with multimeter to confirm signal.
When to Reset vs When to Replace
Replacing the sensor is easier to do while you’re working on the transmission. You’ll have a lot of major parts out of the way, like the slip yoke, drivelines, and driveshaft, freeing up room for you to work on the sensor.
Peterbilt Speed Sensor Replacement Guide
Tools needed: socket set, wrench, dielectric grease.
Preparation
Park on level ground, chock the wheels, and turn the engine OFF. Let the modules rest for 1-3 minutes so that you’re not unplugging it while a power current is still running.
If it’s an Allison transmission, get a drain pan in case fluid leaks from the OSS port.
#1 Identify the Sensor
Located at the transmission’s tail/output shaft, an automated manual might have both ISS (input) and OSS (output). The speedometer/ECM uses the OSS.
There are two styles:
- Push-in, bolt retained body with an O-ring (common on the Eaton/Fuller)
- Thread-in body that screws into the casing
Connector:
- It can be a 2-wire or 3-wire connector. Make sure it fits by matching the product to the truck make/model by the part number.
#2 Unplug the Electrical Connector (Inspect it While You're at It)
- Depress the lock and unplug it.
- Check for any bent pins, green crust, loose terminals, or excess oil.
- Add a touch of dielectric grease on the seal (not on the pins) for an easier install.
#3 Remove the Sensor
- Push-in Style: take off the mounting bolt, then twist and pull the sensor directly out.
- Thread-in Style: at the hex point, break loose and unthread the sensor. Grab and discard the old O-ring if it sticks in the bore.
#4 Inspect Before You Install
- Compare the sensor length, connector, and mounting between the old and new sensor.
- Look at the sensor’s tip and see if there’s any heavy metal fuzz (a sign of internal damage).
- Inspect the tone wheel/reluctor ring with a flashlight and see if there are missing or damaged teeth.
#5 Prep the New Sensor
- Lightly use some ATF/gear oil on the O-ring.
- For thread-in sensors, use the manufacturer’s thread treatment.
- Don’t grease the sensor tip, since this will mess up the connection.
#6 Install and Correctly Set Depth/Air Gap
Fixed-depth push-in (self-setting): insert it and install the bolt to hold it. Push-in sensors establish a good depth gap automatically.
Adjustable designs: the transmission specs feature two common methods.
- Feeler-gauge: set the spec’d air gap value (a few hundredths of an inch – use the OEM value)
- Contact-then-back-off: lightly touch the tone wheel, then get back the sensor out a specified number of turns/clicks.
Thread-in: do it by hand, then torque it to the spec standard.
- Bolt-retained push-in fasteners also get torqued to spec standards.
- Specs will vary by the transmission type – so use the Eaton/PACCAR service number to get the exact value.
Reconnect and secure the harness. Click the connector. Re-clip the loom so it can’t rub the driveshaft, U-joint, or crossmember.
#7 Verify Operations
- Clear any stored VSS codes with the J1939/OBD (on-board diagnostics) tool.
- Start the engine and check the dash speed input with a cluster or service tool data (look at the vehicle speed/OSS rpm)
- Perform a short road test (5-10 mph) to confirm smooth speedometer, normal shift, and a functioning cruise control.
- Fill up any lost transmission fluid (if applicable).
If the fault code reappears: inspect the wiring of the continuity, verify the proper power and ground on 3-wire Hall sensors, and confirm signal output on the 2-wire variable reluctance sensors. You should see AC frequency increase as the speed rises.
REPLACEMENT TIME: (30–60 minutes). Replacing the speed sensor in and of itself isn’t too time-consuming.
Choosing the Right Aftermarket Speed Sensor for Peterbilt Trucks
OEM vs aftermarket (Automann, Wabco, Stemco, Haldex).
You can also cross-reference the product by its part number to verify fitment. Use the search bar function to type in the SKU number and compare the price listings to other top-rated aftermarket sellers.
If you're getting an aftermarket option, you'll likely have better pricing, greater availability, and the option to bulk-order for large fleets, should you wish to do so.
Peterbilt Speed Sensors FAQs
Replace Your Peterbilt Parts Quickly & Affordably at 4 State Trucks
A quick, reliable speed sensor replacement can get your dash and drivetrain working properly once again. We carry a large breadth of engine-related parts for your big rig.
Recent Posts
-
Chrome vs Stainless Steel Exhaust Stacks
 Wondering whether to purchase a stainless steel or chrome exhaust stack kit? Here's a breakdown of t …28th Sep 2026
 -
How to Source Semi Truck Parts Online
 Scambling for the right parts at the last minute can get costly. Here are the best tips to consider …25th Sep 2026
 -
Haul of Fame: J&L Contracting's Award-Winning Truck
 Kenworths: Never Satisfied & Devilish Ways When you talk about Midwest trucking, heavy hauling, and …17th Sep 2026
 -
Semi Truck Exhaust Systems: Parts, Materials, Fitment & Repair Guide
 How a Semi Truck Exhaust System Works A heavy-duty exhaust system has three main jobs: route burned …16th Sep 2026
 -
Diesel Truck Engine Maintenance Guide
 Semi truck engines can last up to one million miles, or more, before they need to be rebuilt or repl …4th Sep 2026
 -
How to Buy the Right Peterbilt 379 Radiator
 If you want to keep your diesel engine from overheating you need a well-functioning replacement Pete …28th Aug 2026
 -
10 Essential Cost-Per-Mile Truck Upgrades that Pay for Themselves
 Small aftermarket semi truck accessories and performance upgrades save more money over time than the …21st Aug 2026
 -
Seasonal Semi Truck Maintenance Checklist
 Freezing winter weather temperatures, heavy snow, ice, and road salt take an unseen toll on your sem …14th Aug 2026
 -
Haul of Fame: Richard Bonner’s 1996 Peterbilt 379 — Bringing a Classic Trucker’s Truck Back to Life
 Every truck has a story, but some are worth taking a closer look at. Richard Bonner’s 1996 Peterbilt …14th Aug 2026
 -
Surviving the Scale: How to Pass Your DOT Inspection & Avoid Crippling Fees
 DOT semi truck inspections can make anyone nervous. There are multiple levels that start from a quic …7th Aug 2026